Photogrammetry has become an essential technique in various industries, from archaeology and architecture to game design and virtual reality. The ability to create accurate 3D models from simple photographs has opened new possibilities in fields that require detailed visual reconstructions. However, taking the right type of photographs for photogrammetry is both an art and a science. If the photos are not of the highest quality or fail to capture enough detail, the final 3D model may be inaccurate or incomplete. 
What is Photogrammetry?
Photogrammetry is the process of using photographs to measure and model objects or spaces. By capturing multiple images of an object from different angles, you can create a 3D model using specialized software that interprets the images to reconstruct depth and spatial details. These 3D models are used in various industries, such as:
- Architecture: For creating 3D models of buildings or landscapes.
- Archaeology: To digitally preserve artifacts and historical sites.
- Gaming and Film: For creating realistic environments and objects in digital form.
- Geography and Cartography: To generate maps and terrain models.
Unlike laser scanning or LiDAR, photogrammetry relies solely on the images taken by a camera to reconstruct the object. The accuracy of the 3D model depends heavily on the quality and quantity of these images, which makes it critical to understand how to take photogrammetry photos properly.
Why Quality Photogrammetry Photos Matter
The success of a photogrammetry project hinges on the quality of the photographs taken. Poor photos will result in incomplete, distorted, or inaccurate 3D models. Here are some reasons why high-quality images are essential:
- Sharpness: Clear, sharp images allow photogrammetry software to identify fine details and textures on the object’s surface.
- Consistency: Even lighting and consistent angles across all images ensure that the 3D model will be cohesive without unexpected artifacts or gaps.
- Coverage: Multiple images from different angles ensure that the object is fully covered, leaving no part unmodeled.
Bad photogrammetry photos lead to wasted time and effort, as the results will often require re-capturing the images. For this reason, investing in the right camera equipment and understanding proper techniques is crucial to the process.

Understanding the Basics of Photogrammetry Photos
Photogrammetry photography is fundamentally different from traditional photography. While the goal in traditional photography might be artistic or aesthetic, in photogrammetry, the objective is to capture precise, overlapping images that software can use to reconstruct a 3D model. This requires a methodical approach and an understanding of how to optimize each shot for the best results. Let’s break down the key elements of photogrammetry photography to ensure you understand the process thoroughly.
What is Photogrammetry Photography?
Photogrammetry photography involves taking multiple images of an object or scene from various angles to later compile them into a 3D model. The goal is to provide the software with enough visual data to accurately recreate the object’s dimensions and surface details. The more angles you capture, the more detailed and accurate your final model will be.
Unlike other forms of 3D scanning, photogrammetry relies entirely on photographs. The software detects matching points in overlapping images, and from there, it determines the spatial relationships between them. It essentially “triangulates” the positions of those points, using geometry to rebuild the object in 3D space. This means that every detail in your photograph counts. Reflections, shadows, and motion blur can all interfere with the software’s ability to match points between images, leading to poor results.
The Importance of Quality Photos in Photogrammetry
High-quality photos are the foundation of accurate photogrammetry. Here are a few reasons why the quality of your photos plays such a critical role:
- Texture and Detail: The more texture and detail visible in the photos, the easier it is for the software to find matching points between images. Flat, featureless surfaces (like smooth plastic or glass) can be more challenging to model unless the photos are taken under optimal conditions.
- Lighting: Consistent, even lighting is key to minimizing shadows and highlights, which can obscure or distort details. If the lighting changes between images, the software might have difficulty matching points correctly.
- Sharpness: Blurry photos reduce the software’s ability to identify unique features. This can lead to incomplete or inaccurate models. Always ensure that your camera settings are optimized to capture sharp, clear images.
- Overlap: Overlapping photos provide more points of reference for the software. Without enough overlap between images, certain parts of the object may not be reconstructed accurately. A rule of thumb is to aim for about 60-80% overlap between adjacent photos.
Taking good photogrammetry photos is not just about using a good camera; it’s also about applying the right techniques. Even with basic equipment, you can achieve excellent results if you follow the best practices for capturing high-quality images.

Equipment Needed for Taking Photogrammetry Photos
Choosing the right equipment is essential when learning how to take photogrammetry photos. While photogrammetry can be done with a range of devices, the quality of the equipment you use will directly influence the accuracy and detail of your 3D models.
What Camera Do You Need for Photogrammetry?
Camera quality plays a pivotal role in producing detailed, high-resolution 3D models. While it’s possible to use a smartphone for photogrammetry, more advanced projects will require higher-end equipment. Let’s explore your options:
- Smartphone Cameras: Many modern smartphones come with high-resolution cameras that can handle photogrammetry for small to medium objects. However, smartphone cameras have limitations in terms of control over settings like aperture and shutter speed, which may affect the quality of your photos. Despite this, they are a good starting point for beginners.
- DSLR and Mirrorless Cameras: For more detailed work, especially on large objects or complex scenes, a DSLR (Digital Single-Lens Reflex) or mirrorless camera is ideal. These cameras allow for full manual control over settings like ISO, aperture, and shutter speed, giving you more flexibility in capturing high-quality images. A camera with at least 12-24 megapixels is recommended for photogrammetry, as it will ensure that your images are sharp and contain enough detail for accurate modeling.
- Lenses: The lens you choose is just as important as the camera body. Wide-angle lenses are typically used for larger objects or environments, while macro lenses are better for capturing smaller objects in detail. It’s important to avoid lenses that distort the image, such as fish-eye lenses, as this can make it harder for the photogrammetry software to interpret the images correctly.
Minimum Camera Specifications for Photogrammetry
Here are some basic guidelines for camera specifications to get the best results in photogrammetry:
| Camera Specification | Minimum Requirement | Ideal Requirement |
|---|---|---|
| Resolution | 12 megapixels | 24+ megapixels |
| Lens | Standard zoom or macro | Prime lens (fixed focal length) |
| Aperture Control | Auto or limited manual | Full manual control |
| Shutter Speed | Auto | Full manual control |
| File Format | JPEG | RAW (for more detail) |
The higher the resolution of your camera, the more data the photogrammetry software will have to work with. This is especially important if you’re working on projects that require fine details, such as modeling intricate objects or textured surfaces.
Additional Equipment for Better Photogrammetry Results
While a good camera is the foundation of photogrammetry, there are several pieces of additional equipment that can improve the quality of your photos and make the process smoother:
- Tripods and Stabilizers: To avoid camera shake and ensure consistent images, using a tripod or stabilizer is crucial. This is especially important when taking many images of the same object from different angles. Tripods also allow for precise adjustments in height and angle, ensuring consistency across all your shots.
- Lighting Equipment: Lighting is one of the most critical factors in photogrammetry. Natural light can vary significantly, especially in outdoor environments, so having portable lighting equipment can help control shadows and highlights. LED panels or softboxes can provide even, diffuse light, reducing harsh shadows and making it easier to capture all the necessary details.
- Drones for Aerial Photogrammetry: If you’re capturing large environments or buildings, a drone equipped with a camera is a fantastic tool for aerial photogrammetry. Drones allow you to capture high-resolution images from angles that are otherwise impossible to reach. When using drones, ensure that you maintain a stable flight path and capture a sufficient overlap between images (usually 60-80%).
- Polarizing Filters: Reflective surfaces such as glass or water can cause issues in photogrammetry by introducing glare. A polarizing filter can help reduce reflections, making it easier to capture these surfaces accurately.
Photogrammetry Software
Once you have captured your images, you’ll need specialized software to process them and generate a 3D model. Some popular photogrammetry software options include:
- Agisoft Metashape: A widely-used option that is powerful but user-friendly.
- RealityCapture: Known for its speed and quality, though it requires higher-end hardware.
- Meshroom: An open-source option for beginners, offering a good balance between quality and ease of use.
When selecting software, it’s important to consider factors like processing speed, ease of use, and the ability to handle large datasets. While some software requires a steep learning curve, many offer user-friendly interfaces that are perfect for beginners.

Step-by-Step Guide: How To Take Photogrammetry Photos
Now that you have your equipment ready, it’s time to dive into the actual process of taking photogrammetry photos. Capturing the right images is key to generating accurate and detailed 3D models. This step-by-step guide will take you through everything you need to know, from preparing your object or scene to organizing your photos for processing. Follow these steps to ensure that your photogrammetry project is successful.
Step 1: Prepare the Object or Scene
Before taking any photos, it’s essential to prepare the object or environment you plan to capture. Proper preparation can prevent common issues like reflections, poor lighting, or insufficient detail.
- Choosing an Object: Start by selecting an object that has enough texture or surface variation. Objects with a lot of flat, featureless surfaces (like glass or polished metal) can be challenging for photogrammetry software to process because there aren’t enough unique features for the software to match between photos. Textured objects, such as rocks, plants, or sculptures, are much easier to capture.
- Surface Considerations: If your object has reflective or transparent surfaces, consider using a matte spray to dull the surface temporarily, as reflections can confuse the photogrammetry software. For very shiny objects, you might also consider using a light diffuser to reduce glare.
- Background Clutter: Make sure the background is free of clutter that could interfere with the object. A plain, uniform background will make it easier for the software to differentiate between the object and its surroundings. If you are working indoors, use a neutral background or cloth to isolate the object. Outdoors, position the object in a way that minimizes distractions in the background, such as trees or buildings.
Step 2: Set Up Your Camera
Your camera settings will play a significant role in determining the quality of your photogrammetry photos. Here’s how to optimize your camera for the task:
- Camera Settings: Always shoot in manual mode. This gives you full control over important settings like aperture, shutter speed, and ISO. Here are the key settings to adjust:
- Aperture: Set the aperture to a medium value (f/8 to f/11) to ensure a good depth of field, where the entire object is in focus.
- Shutter Speed: Adjust the shutter speed to avoid any motion blur. If you’re using a tripod, you can afford to use slower shutter speeds to let in more light.
- ISO: Keep the ISO as low as possible (e.g., ISO 100-400) to reduce noise and grain in your images. Noise can confuse the photogrammetry software, so it’s best to minimize it as much as possible.
- Distance from the Object: The distance between the camera and the object is crucial. For smaller objects, shoot from a distance that allows you to capture the entire object in the frame without zooming in too much. For larger scenes, walk around the object at a consistent distance, ensuring you cover every angle.
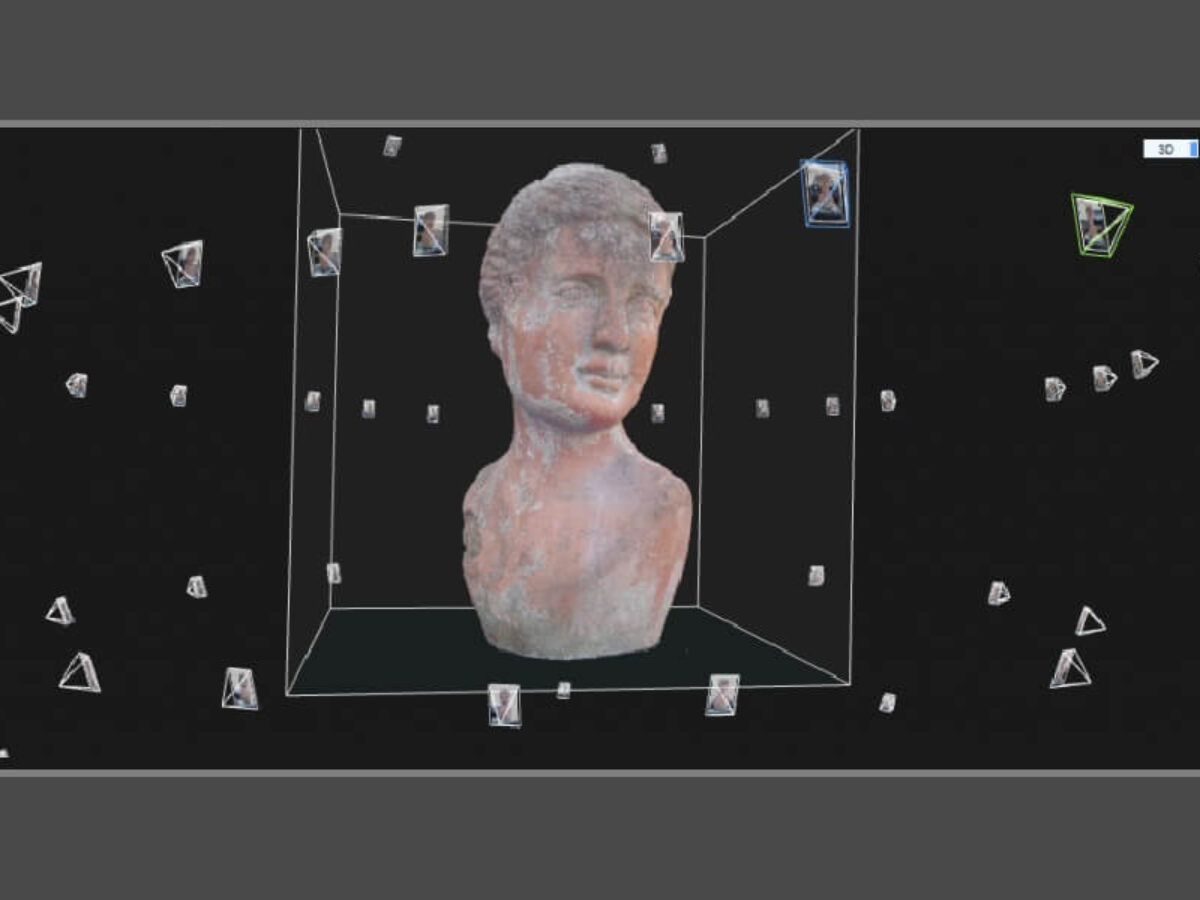
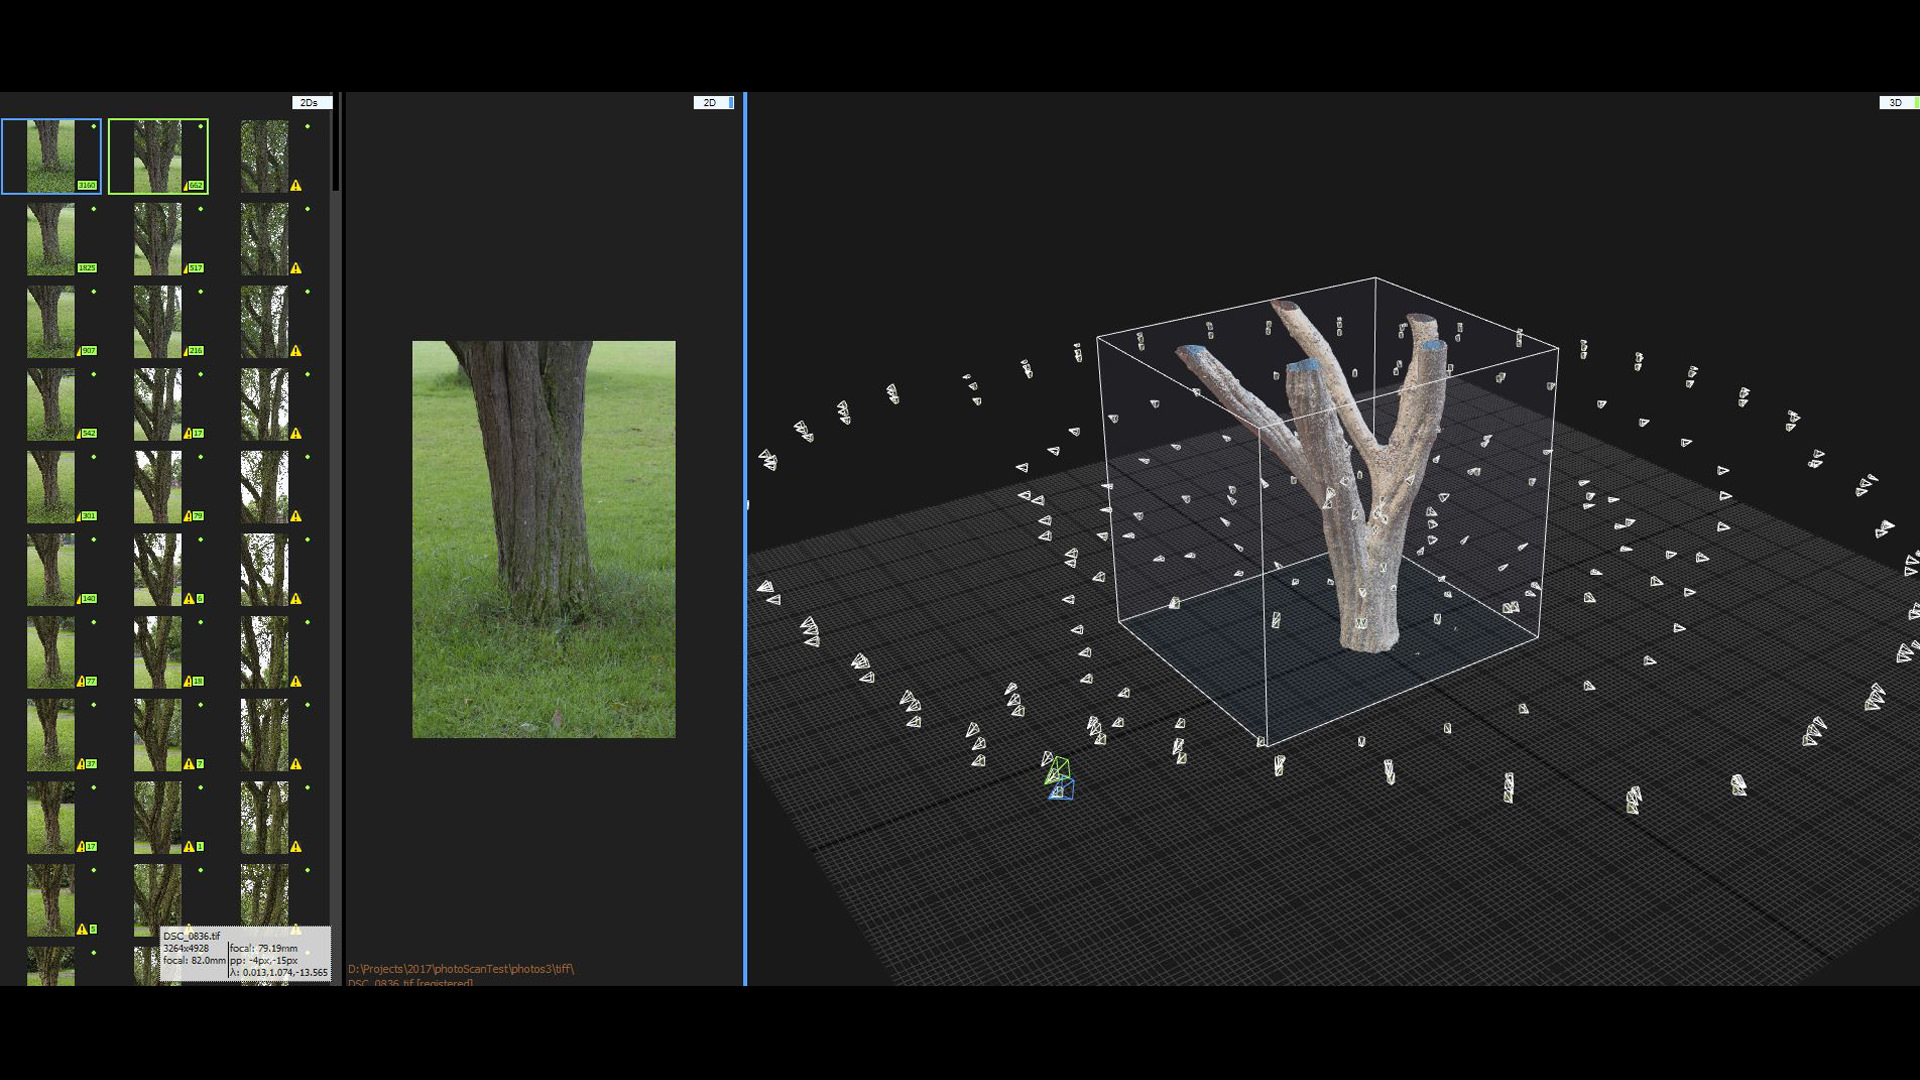
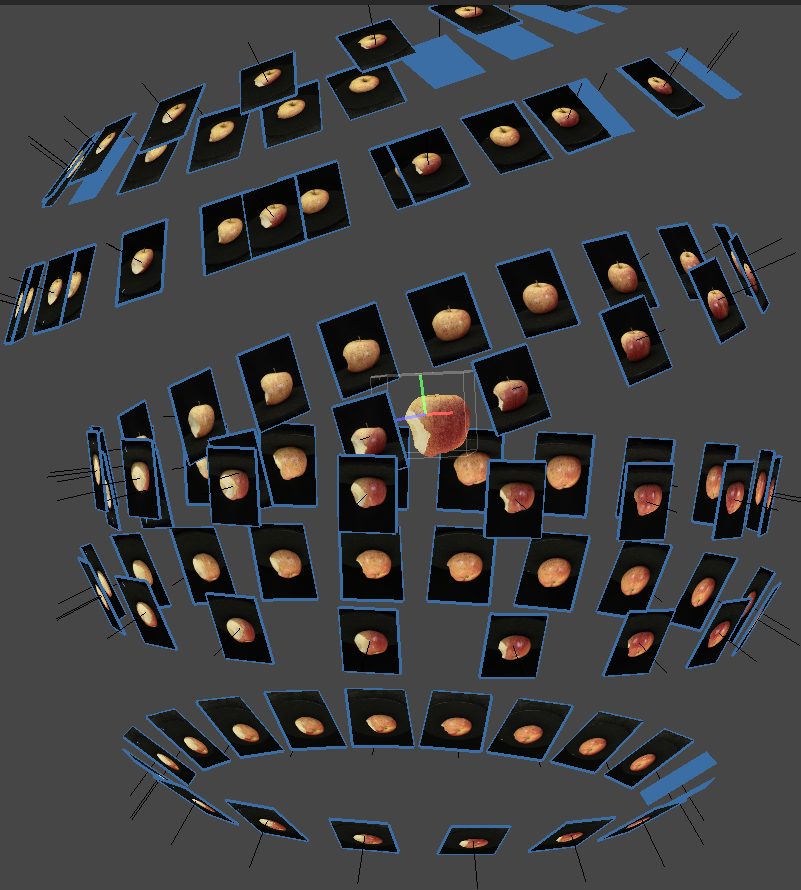
- Angle and Positioning: When shooting photogrammetry photos, the goal is to capture the object from as many angles as possible. This means taking photos from above, below, and all sides of the object. You should aim to move around the object in a circular pattern, keeping the camera at a consistent height for each pass.
Example: If you are photographing a statue, start by capturing a full 360-degree view at eye level. Then, move the camera up or down to get different vertical angles (e.g., shooting from above or below the object). Aim for 60-80% overlap between adjacent images to ensure that the software has enough visual data to process.
Step 3: Taking Photos for Photogrammetry
Once your camera is set up and the object is prepared, you can begin capturing images. This is the most critical step in the process because poor photo coverage or bad angles will lead to incomplete or inaccurate 3D models. Follow these guidelines to get the best results:
- How Many Photos to Take: The more photos you take, the better. A general rule of thumb is to capture between 30 to 100 photos, depending on the complexity of the object. Complex objects with more intricate details may require more photos to cover all angles and ensure there are no gaps in the coverage.
- Overlap: Ensure that each photo overlaps with the previous one by at least 60-80%. This overlap is what allows the photogrammetry software to stitch the images together and create a 3D model. If there is too little overlap, parts of the object may not be reconstructed.
- Consistency: Maintain consistency in your camera settings, distance, and angles as you move around the object. Any major variations in these factors can lead to inconsistencies in the final 3D model.
- Avoid Reflections and Shadows: When photographing shiny objects, use diffused lighting or a polarizing filter to minimize reflections. Shadows can obscure details and confuse the software, so try to keep lighting even across the object. If necessary, move the object or adjust the lighting to avoid harsh shadows.
Step 4: Organizing and Storing Your Photos
After you’ve captured all the images, it’s important to organize and store them properly before processing. Keeping your photos well-organized will make it easier to manage large photogrammetry projects.
- Labeling Your Photos: Rename your images in a way that makes sense for the project. For example, you could name them sequentially (e.g., Statue_001, Statue_002) to keep track of the order in which they were taken. This will help you when it’s time to upload them to the photogrammetry software.
- File Format: If possible, shoot in RAW format rather than JPEG. RAW files contain more image data, which can be useful for post-processing. However, keep in mind that RAW files are larger, so you’ll need more storage space.
- Storage: Store your photos in a safe location, such as an external hard drive or cloud storage. Backing up your files is essential, especially if you’re working on a large project that required significant time and effort to capture.
Ideal Camera Settings for Photogrammetry Photos
| Setting | Recommended Value | Purpose |
|---|---|---|
| Aperture | f/8 to f/11 | Ensures sufficient depth of field |
| Shutter Speed | Adjust based on light | Prevents motion blur |
| ISO | 100-400 | Reduces image noise for clearer photos |
| Overlap | 60-80% | Ensures software can stitch images together |
| Photo Count | 30-100+ | Provides enough data for detailed reconstruction |